How to Make Café-Quality Espresso at Home: A Barista’s Secret Guide
The price of home espresso machines might surprise you – they cost anywhere from $100 to $5,000. This wide range gives you plenty of options whether you’re starting your home espresso experience or planning to upgrade your setup.
The sort of thing I love about espresso making is its demand for precision. A perfect shot needs 7-9 grams of coffee to produce 25-35 ml of espresso. The brewing process requires specific pressure for exactly 20-30 seconds. The water hardness must stay between 35-85 parts per million to extract optimal flavor.
These numbers might seem daunting at first. We created this detailed guide to help you become skilled at making café-quality espresso in your kitchen. Our guide will give you everything you need to pull that perfect shot – from equipment selection to technique refinement.
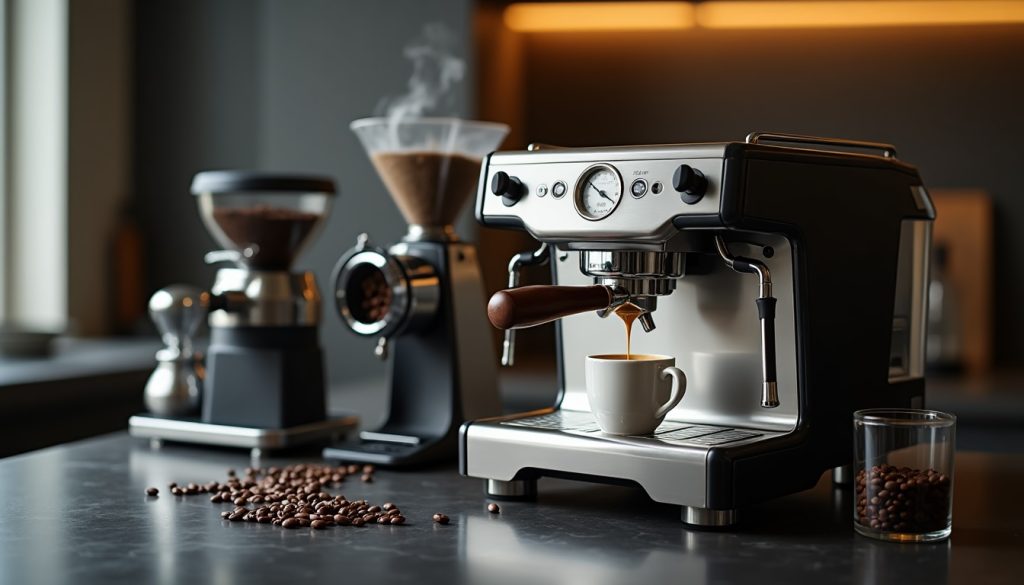
Essential Equipment for Home Espresso
Making café-quality espresso at home starts with the right equipment. You’ll need three simple components to begin: an espresso machine, a reliable grinder, and basic accessories.
Choosing Your First Espresso Machine
Semi-automatic espresso machines give you the best balance between control and ease of use. These machines keep pressure and temperature steady between 195-205°F to extract the best flavor. Your first machine should have features like PID temperature control and pre-infusion capabilities. These features help you pull consistent shots.
Grinder Types and Features
A quality burr grinder is maybe more significant than the espresso machine itself. You’ll find two main types: we used flat burrs mostly in commercial settings, while conical burrs are common in home grinders. Stepless grind adjustment lets you control your grind size with precision. A good grinder should also retain minimal grounds to keep each shot fresh.
Must-Have Accessories
Your home espresso setup needs:
- A high-quality tamper that fits your portafilter perfectly
- A precision scale to measure beans and shots
- A knock box to dispose of used pucks easily
- A milk frothing pitcher for steamed milk drinks
- Microfiber cleaning towels to maintain your setup
Water quality affects espresso taste by a lot. Using filtered water with the right mineral content will help your machine last longer. The best water hardness ranges between 35-85 parts per million to extract optimal flavor.
Start with a machine that gives you steady temperature and pressure control, along with a quality burr grinder. These two pieces are the foundations of your espresso-making experience. The right accessories will help you improve your technique and keep your equipment in top shape.
Selecting Quality Coffee Beans
The life-blood of creating exceptional espresso at home lies in choosing the right coffee beans. Note that your beans’ roast date matters more than the “best by” date when checking for freshness.
Understanding Roast Levels
The best espresso beans should fall within the medium to medium-dark roast range. The roasting process starts at 350°F – 400°F with the “first crack,” which marks the original stage of development. Beans then reach a second crack at 410°F – 430°F and develop deeper flavors.
Medium roasts create a balanced taste profile that’s nowhere near as acidic as lighter roasts. Medium-dark roasts show rich, dark colors with minimal oil on their surface and produce flavors from bittersweet to spicy and chocolatey. Beans lose their unique characteristics when roasted beyond this point, especially after reaching an Agtron reading of #55.
Bean Storage Tips
Your espresso’s quality depends heavily on proper storage. These four elements can ruin your beans, so keep them away:
- Direct sunlight
- Excessive heat
- Moisture
- Oxygen
Many people think storing beans in the refrigerator helps, but this actually damages their flavor. Coffee beans’ porous nature makes them absorb surrounding odors easily, which can affect their taste. A cool, dark cupboard at room temperature works best.
Buy smaller quantities of beans that you can use within 2-3 weeks to maintain freshness. Vacuum-sealed containers with one-way valves are a great way to store larger quantities as they release carbon dioxide while blocking oxygen. This storage method preserves the beans’ natural oils and aromatic compounds that you need to create perfect espresso shots at home.
Basic Espresso Making Steps
A perfect espresso shot demands precision and careful attention to detail. Let’s explore the key steps that reshape the scene from freshly roasted beans to a rich, flavorful espresso.
Grinding Your Beans
Fresh grinding before brewing creates optimal flavor extraction. The grind consistency should feel like fine sand. The grounds’ texture should feel soft and slightly grainy between your fingers. Lighter roasts need a finer grind, while darker roasts work better with a coarser setting.
Measuring Coffee Dose
The right measurements will give a consistent espresso shot. A double shot needs 18-20 grams of coffee. Your portafilter should rest on a scale and be tared before grinding. A single basket works with 7-10 grams, and triple baskets need 20-22 grams.
Tamping Technique
The right tamp creates an even coffee bed that extracts perfectly. The tamper should be held like a doorknob with your arm at a 90-degree angle. A firm, steady pressure keeps the tamper level with the basket’s rim. The pressure consistency matters more than amount – tests reveal only a 3% difference between comfortable and heavy tamps.
Shot Timing
The perfect shot follows a specific extraction sequence. The timing starts when you activate the pump. A proper double shot takes 25-30 seconds. The extraction shows these visual signs:
- Original phase: Dark, thick drips (3-5 seconds)
- Middle phase: Tiger striping appears
- Final phase: Rich, steady flow
- Complete: Stop at desired yield
The shot begins with slow, syrupy drips and develops into a thick, striped stream. The best results come from a 1:2 ratio of coffee to liquid espresso. An 18-gram coffee dose should yield a 36-gram shot.
Fine-Tuning Your Technique
You need to constantly fine-tune your technique to become skilled at making espresso. Small adjustments can make a big difference in your final cup.
Adjusting Grind Size
Grind size affects extraction quality directly. You should make adjustments in tiny increments because even minor changes can affect flow rate dramatically. We noticed that if shots pull faster than 25 seconds, the grind needs to be finer. If extraction takes more than 40 seconds, go slightly coarser. Weather conditions affect grinding naturally – temperature, humidity, and barometric pressure influence how beans respond to grinding.
Dialing in New Beans
Each new bag of coffee needs fresh calibration. You’ll need to invest an entire bag to learn the optimal settings. Beans grind differently as they age – a 5-day-old coffee responds differently than the same beans at 10 or 15 days. Your grinder works more consistently after the burrs are seasoned, which usually takes 3-5 pounds of coffee.
Tasting Notes Guide
Here’s how to identify key flavor indicators:
- Sour or salty notes suggest under-extraction
- Bitterness and dryness indicate over-extraction
- Balanced sweetness with refreshing acidity signals optimal extraction
Recording Your Results
Document every adjustment in your coffee-making process. Keep track of dose weight, extraction time, grinder settings, and tasting notes. Note workflow changes and whether you’d buy those beans again. This documentation helps you replicate successful shots and understand what works best for different coffees.
Ideal Water Quality
Water composition affects extraction substantially. The ideal mineral content should measure between 35-85 parts per million. Magnesium-rich water improves extraction quality and enhances flavor. You should test your water every three to four months because seasonal changes affect water quality.
Temperature Control Basics
Keep brewing temperature between 195°F and 205°F (90.5°C to 96°C). Temperature stability throughout extraction ensures consistency. If your shots taste too acidic with light roasts, try higher temperatures. Darker roasts need lower temperatures to help bring out delicate notes.
Mastering Water and Temperature
Water quality and temperature control are the foundations of exceptional espresso making. Water makes up 98% of your espresso shot, which makes it the most significant ingredient after coffee beans.
The ideal mineral content to extract espresso ranges between 35-85 parts per million. Filtered water provides consistent results, unlike tap water that often contains varying mineral levels. Hard water with excessive calcium and magnesium can affect your coffee’s taste and your machine’s lifespan.
Your water should meet these significant parameters to work well:
- pH level between 6 and 8
- Calcium hardness: 50-175 ppm
- Total alkalinity: 40-70 ppm
- Zero chlorine content
Water that’s too hard creates limescale deposits in your machine’s components. This reduces heating efficiency and might cause breakdowns. Without doubt, you should test your water quality every three to four months since seasonal changes affect mineral composition.
Temperature control is just as vital for extraction. The optimal brewing range lies between 195°F and 205°F (92°C-96°C). Light roasts need higher temperatures within this range, while darker roasts extract better at lower temperatures.
Temperature stability throughout extraction will give a consistent result. Modern espresso machines use PID controls to maintain precise temperatures. Your shots’ taste might vary if your machine doesn’t have built-in temperature control. Cold water creates sour notes, while excessive heat creates bitterness.
Water’s relationship with coffee goes beyond simple extraction. Magnesium-rich water boosts flavor development, but too much calcium carbonate can mute coffee’s aromatic compounds. Home baristas looking for café-quality results should invest in a quality water filtration system – it’s more affordable than buying bottled water.
Note that you should descale your machine based on your water’s hardness level. Many modern machines let you program water hardness settings and send timely maintenance reminders. This approach protects your investment and helps deliver superior espresso shots consistently.
Common Espresso Problems
Troubleshooting espresso problems needs systematic diagnosis and precise adjustments. A good understanding of common issues will help you make excellent shots at home consistently.
Why Shots Pull Too Fast
Multiple factors work together to cause fast-flowing shots. We focused on incorrect grind size as the main reason water flows through coffee too quickly. Water passes through coarse grounds faster and leads to under-extraction with weak flavor.
These elements need checking to fix fast shots:
- Grind setting needs adjustment – aim for fine, sand-like consistency
- Coffee dose should match basket size – typically 18-20g for doubles
- Distribution must be even before tamping
- Proper tamping pressure applied consistently
Equipment issues might also cause fast shots. Your grinder’s calibration can move over time, which makes what used to be a fine setting become coarser. Regular grinder maintenance will give a consistent performance.
Fixing Bitter Taste
Over-extraction usually creates bitter espresso. This happens when water bonds too much with the coffee, often because grounds are too fine or flow is restricted. The brewing temperature should stay between 92-96°C. Coffee can get scorched at higher temperatures and taste unpleasantly bitter.
The machine’s temperature needs checking first to fix bitter shots. Dark roast beans might need slightly lower brewing temperatures. Dirty equipment changes coffee taste quickly – residue collects in the coffee bed and starts to mold.
Dealing with Weak Crema
Bean freshness issues often cause weak or missing crema. Espresso beans work best between 7-21 days after roasting. Beans older than three weeks ended up producing less crema because their oils and gasses deplete.
These factors affect crema quality:
- Pressure must maintain 6-9 bars during extraction
- Water temperature should stay between 185-198°F
- Pre-ground coffee oxidizes quickly, reducing crema formation
Light roasts make less crema than medium or dark roasts naturally. Your machine needs proper pressure throughout the shot when fixing weak crema. The pre-infusion stage should gently wet the grounds under lower pressure before full pump power kicks in.
Conclusion
Creating café-quality espresso at home needs attention to detail and practice. Every component matters – from choosing the right equipment to controlling temperature precisely. Your understanding of how these elements work together helps you create exceptional shots consistently.
Quality beans are the foundations of great espresso. Fresh roasts, proper storage, and precise grinding turn ordinary coffee into extraordinary drinks. We have a long way to go, but we can build on this progress with proper guidance and experimentation.
Want to begin your home barista experience? Check out our Freshly Roasted, Handcrafted, Organic, and Fair Trade Coffee Beans that we’ve carefully selected to match your preferred roast level and taste profile.
Note that you can make perfect espresso at home with three essential elements: quality equipment, fresh beans, and proper technique. Your shots will rival your favorite café when you practice consistently and pay attention to these details. Start small, adjust gradually, and track your progress – you’ll soon become skilled at making exceptional home espresso.